No-Bake Chocolate Coated Pumpkin Cheesecake Truffles

When I worked as a private chef in Indianapolis and Florida, I had the chance to cater all kinds of events, from intimate dinners to large gatherings. One of the most memorable was a Halloween party for 40 guests. Alongside flatbreads, meatballs, and other treats, I served chocolate-coated cheesecake truffles that were an absolute hit. Inspired by those truffles, I’ve created this easy, no-bake Pumpkin Cheesecake Truffles recipe that’s perfect for fall.
These truffles are not only delicious but also healthy, using wholesome ingredients like chickpeas and pumpkin. They’re naturally sweetened and gluten-free, making them a guilt-free treat that everyone can enjoy. Plus they're quick and easy to make!
In just 30 minutes, you’ll have about 32 truffles ready to enjoy or share at your next gathering. Whether you’re preparing for a holiday party or just want a sweet snack to keep in the fridge, these truffles are the perfect choice.

Why You'll Love These No-Bake Pumpkin Cheesecake Truffles
These No-Bake Pumpkin Cheesecake Truffles are a dream come true for anyone who loves pumpkin! Not only do they combine the warm, comforting flavors of pumpkin pie with the indulgence of creamy truffles—all without turning on your oven—but they’re also a healthier option you can feel good about.
They are:
No-bake
Vegan
Gluten-free
Dairy-free
Refined sugar-free
High in protein
Fiber-filled
This makes them perfect for holiday parties or as a sweet treat to enjoy year-round, regardless of dietary preferences. Whether you're looking for a festive dessert or a healthy snack, these truffles check all the boxes.
Make These Truffles for Halloween!
If you’re preparing for a Halloween party or just want to add a festive touch, sprinkle the coated truffles with a pinch of sea salt, crushed nuts, or sprinkles before the chocolate hardens. Adding edible eyes can make them a fun and spooky treat for kids. They’re a huge hit and a perfect addition to any Halloween spread.

Jazz's Recommended Products
When it comes to preparing these delicious Pumpkin Cheesecake Truffles, having the right tools in your kitchen makes all the difference. Here’s what I recommend:
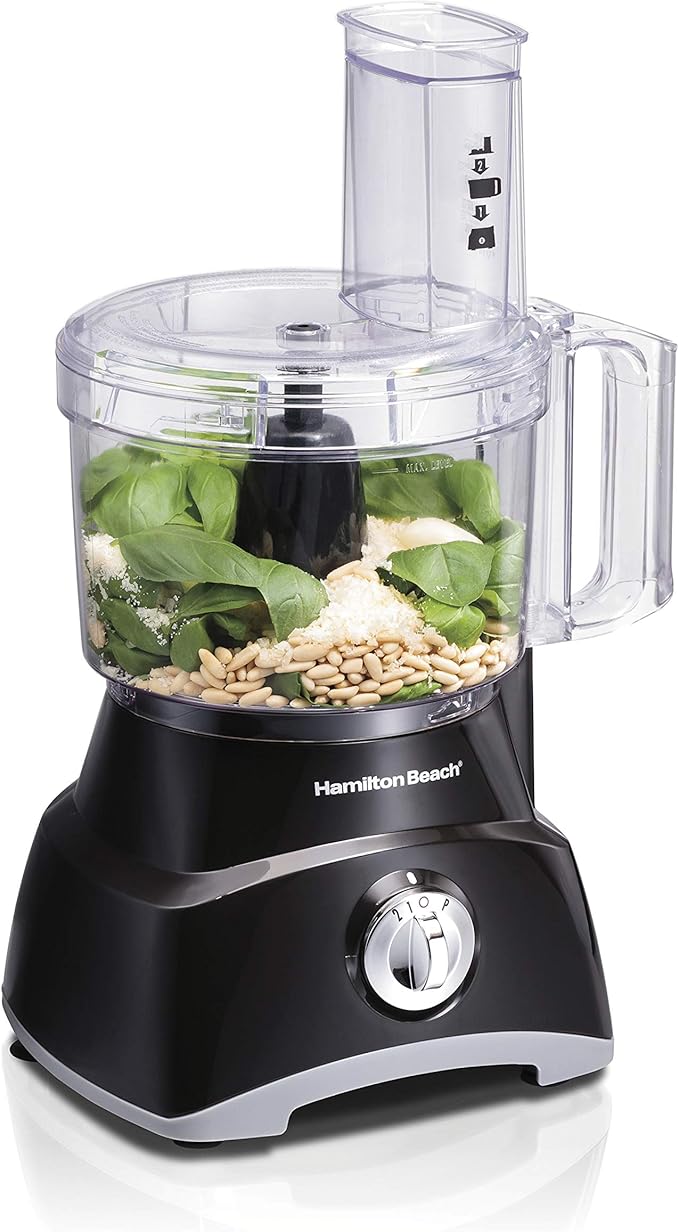
Hamilton Beach Food Processor: This 8-cup food processor is perfect for blending ingredients smoothly. It’s powerful, versatile, and easy to clean.
Ingredients for Perfect Pumpkin Cheesecake Truffles
For the Truffles:
1 can chickpeas, drained and rinsed
1 cup canned pumpkin puree
1/3 cup maple syrup
1/2 cup coconut flour
1 tablespoon pumpkin pie spice
2 teaspoons cinnamon
1/2 teaspoon sea salt
For the Chocolate Coating:
1/2 cup chocolate chips
1 tablespoon coconut oil
How to Make Pumpkin Cheesecake Truffles
Make the Truffle Mixture:
Start by making the truffle mixture. Place the drained and rinsed chickpeas, canned pumpkin, maple syrup, coconut flour, pumpkin pie spice, cinnamon, and sea salt in a food processor. Blend everything together for about 1 minute, or until the mixture is smooth and well combined. Make sure to scrape down the sides to get a uniform texture. This combination of pumpkin puree and chickpeas results in a creamy truffle mixture that's packed with pumpkin flavor.Form the Truffles:
Once your truffle mixture is ready, it’s time to form the truffles. Scoop out the mixture and roll it into small balls, about 1 tablespoon each. You should end up with around 32 truffles. After rolling them, place the truffles in the fridge or freezer to firm up while you prepare the chocolate coating. Chilling them for 15 to 30 minutes helps the truffles hold their shape and makes the dipping process easier.Prepare the Chocolate Coating:
For the chocolate coating, combine the chocolate chips and coconut oil in a microwave-safe bowl. Heat in the microwave in 15-second intervals, stirring after each, until the chocolate is completely melted and smooth. You can also use a double boiler for this step if you prefer. This melted chocolate will create a delicious coating that adds a rich, creamy layer to the pumpkin cheesecake truffles.Coat the Truffles:
Take the chilled truffles and dip each one into the melted chocolate, making sure they’re fully covered. Place the coated truffles on a parchment-lined cookie sheet or wax paper. This ensures that the chocolate doesn't stick and the truffles remain neat. For a fun twist, you can sprinkle the coated truffles with a pinch of sea salt or add gingersnap crumbs before the chocolate hardens.Set the Truffles:
Put the baking sheet in the fridge for about 15 minutes to allow the chocolate coating to harden. After that, your truffles are ready to enjoy! Store any leftover truffles in an airtight container in the fridge for up to 5 days.

Substitutions and Variations
Chickpeas: If you prefer, you can use white beans (like cannellini beans) instead of chickpeas. This will give a slightly different flavor but still maintain the creamy texture.
Pumpkin: For a different twist, try using mashed sweet potato or butternut squash in place of canned pumpkin. These substitutions can add a unique flavor while keeping the truffles delicious.
Coconut Flour: Almond flour or oat flour can be used as substitutes, but you may need to adjust the amount slightly. If using almond or oat flour, nearly double the amount to achieve the right consistency.
Maple Syrup: Any liquid sweetener like agave, honey, or date syrup can replace maple syrup. Each option brings its own subtle flavor to the truffles.
Chocolate Chips: Feel free to use dark, milk, or white chocolate chips for the coating. Each type of chocolate will give a different but equally delightful result.
Coconut Oil: You can substitute butter or any neutral oil for coconut oil if needed.
Jazz's Tips for the Best Pumpkin Cheesecake Truffles
Adjust Sweetness: Taste the truffle mixture before rolling to see if it’s sweet enough for your liking. Add a little more sweetener if needed for the best results.
Chill Before Coating: Ensure the truffles are firm before dipping them in chocolate. This helps the chocolate coating set quickly and evenly.
Prevent Sticky Hands: Lightly wet your hands with water or oil before rolling the truffle mixture into balls to avoid sticking.
Microwave Chocolate Gradually: Melt the chocolate in short intervals, stirring in between, to prevent it from burning.
Work Quickly: After melting the chocolate, work quickly to dip the truffles before the chocolate begins to harden. Using a toothpick can make dipping easier; simply stick it into each truffle, dip into the chocolate, and then smooth over the hole.
FAQs
-
Graham cracker crumbs are not used in this specific pumpkin cheesecake truffles recipe, but they can be a great addition if you’re making a graham cracker crust or want to add a bit of crunch. If you’d like to incorporate graham crackers, you can crush them into crumbs and mix them into the pumpkin mixture for added texture or roll the truffles in the crumbs after coating with chocolate.
-
To keep your pumpkin cream cheese truffles fresh, store them in an airtight container in the refrigerator. This will help maintain their texture and flavor. If you have any excess chocolate or pumpkin mixture, you can wrap it in plastic wrap and store it separately. The truffles should be kept at room temperature for up to 5 days.
-
For the best results, use high-quality dark chocolate to coat your truffles. Dark chocolate provides a rich flavor that complements the pumpkin spice flavors of the truffles. You can also use creamy white chocolate or almond bark if you prefer a different taste. Melt the chocolate in a small bowl or medium saucepan over medium-low heat, stirring frequently to avoid excess moisture and ensure a smooth coating.
-
While you can substitute pumpkin puree with pumpkin pie filling, it’s important to note that pumpkin pie filling is pre-sweetened and contains spices. This might alter the sweetness and spice level of your truffles. For the best end result, use plain canned pumpkin puree, and adjust the spices and sweeteners as needed for your recipe.
-
If you find that your chocolate is becoming too thick or clumping, it’s likely due to excess chocolate or moisture. To avoid this, ensure you melt the chocolate slowly using a double boiler or in a medium saucepan over medium-low heat. Adding a small amount of coconut oil can help achieve a smoother consistency. If you have remaining white chocolate chips, you can mix them in to achieve a creamier texture.
These no-bake Pumpkin Cheesecake Truffles are not just an easy pumpkin truffles recipe; they are a delicious and healthy treat that will impress your family and friends. They combine pumpkin pie spice flavors with a creamy truffle filling and a rich chocolate coating. Enjoy these as a sweet snack or a festive treat for any occasion!


Pumpkin Cheesecake Truffles
Ingredients
- 1 can chickpeas, drained & rinsed
- 1 cup canned pumpkin
- 1/3 cup liquid sweetener (maple syrup, agave, or honey)
- 1/2 cup coconut flour
- 1 tablespoon pumpkin pie spice
- 2 teaspoon cinnamon
- 1/2 teaspoon sea salt (optional but recommended)
- 1/2 cup chocolate chips
- 1 tablespoon coconut oil
Instructions
- Add all of the truffle ingredients into a food processor or blender. Blend for about 60 seconds until a smooth consistency is attained.
- Roll the batter into 1 tablespoon size balls, making about 32 truffles.
- Set the truffles in the fridge or freezer while you prepare the coating.
- Melt the chocolate and coconut oil in a microwave-safe bowl in about 15-second increments until a smooth consistency is attained. Stir every 15 seconds with a spoon.
- Roll the balls into the melted chocolate & set on a parchment paper-lined baking sheet.
- Set in the fridge for about 15 minutes to harden, then enjoy!
- Keep these stored in the fridge for up to 5 days!